Wednesday, September 14, 2011

Halloween Jello Man

Have I ever mentioned how clever the Hubs is? Well, he thought of something to be the highlight of a Halloween party we had a couple of years ago.  I'm sharing this so early in the season because if you want to do it, you need to buy the supplies STAT. To do it successfully you need two mannequin torsos and a whole bunch of Jello.  You can get mannequin torsos on ebay or Amazon.com (lots of places, really).  They are kind of pricey if you buy new, which we did, but you can find them for around $15 used.  We also got a heart, brain, and eyeball molds but you really don't need them for this project.

Two nights before our party we greased up the inside of a torso and made a bunch of peach Jello and mixed it with milk then dumped it in the greased torso. Next we put the other torso on top and took it outside in the cold air (because it didn't fit in the fridge) to harden over night.  This is the skin.


The next day I made a Jello heart out of a mold that we got.  It didn't work well when we put it in the torso because the Jello just sort of stuck together, so maybe if we made the heart out of something else I would have liked it better.

Then we mixed a jillion boxes of raspberry Jello and dumped it in the torso on top of the peach "skin." .
Next, we put the heart in and added gummy worms in the stomach area and Baby Ruth candy bars where the intestines would be.  Then we took it outside to set up overnight so it would be ready for the party the next night.
Party night...

Doesn't it look creepy! It came out of the mold really easily because we greased it before doing the skin.  I couldn't have been more satisfied with how the skin turned out. We made the blood with berry jam.

As part of the party, we had our guests dissect the Jello man.  The picture on the right is just after the Baby Ruth was dissected from out of the colon area-- I know it's disgusting... but so great.


Linking up! Join me!


Photobucket"

Tuesday, September 13, 2011

Guest Post

Hey everyone!  Just wanted to let you know that I'm the guest poster over at A Turtle's Life For Me.  See how I took this grandfather clock from DRAB to FAB (okay, I really don't think it's drab as it is in this picture, but it's better finished).   Click here to see.

Monday, September 12, 2011

The Actual Turquoise Piano

Doing this blog and the projects featured in it has been so much fun for me.  And since the name is The Turquoise Piano, I decided that it was time to really feature my piano.  

Here is the before.  This was the actual picture from craigslist, where I found it.  I think they listed it for $100 and I emailed and told them I would give them $50 and pick it up if they were interested in that offer.  They were so I got my crew (my husband, brother-in-law, and we hired a neighbor handy man) and sent them on their way to pick it up.  The handy man had the truck and trailer so with his time, gas, and the mode of transportation, we gave him $50.  That takes the total to $100.  

When it arrived at my house I started the redo by sanding.  Disclaimer:  I had/have no clue how to really redo a piano, although I'm sure I could google it and learn in point-two seconds.  I have a friend who took hers apart and did everything, but come on, this had only cost $100 by this point so I didn't think there was a problem in figuring it out by myself with the piano all together.
 
Next I took a bucket of primer that was left over from our house and I covered the piano with it.  I do like it white.  If I had an all-white living room, this would be the piano.
Next was the paint for the piano.  Previously I had been jogging through this neighborhood and I came across a garage sale where they were selling used paint.  I snatched up a can of off white for $2.  It was from Lowe's so I took it over to them and asked if they could make it as close to one of their turquoise swatches as possible.  The color that came out was this amazing Tiffany blue.  I love love love it!  Seriously.  The exact color of the Tiffany & Co box!  So I painted the piano with the $2 turquoise garage sale paint.  So now we're up to $102 for this awesome piano.  Pretty great deal, huh?

Then I drove on over to Joann's and bought some white vinyl material to cover the bench.  It cost more in gas to get there than the actual material with my 50% off coupon.  I think material for the bench was $2.

This is that white mirror above the piano (see bronze/gold mirror below).  You can't see but it had a huge chunk taken out of it (it's plastic).  I really liked it though so I bought it for $5 and fixed it with a combination of shims, hot glue (like a whole glue stick) and wood filler.  Then I painted it white and hung it above the piano.  
If you go back and look at the finished project you will see three milk bottle vase things.  I love them and I got them at the thrift store or garage sales for $.75 each.  The other white statue was a gift.  Grand total of the piano area -- $111.25.

Then I got the piano tuned and some of the sticky keys fixed, which cost about another $100, but that's maintenance so it doesn't count.

You can click on my youtube link to listen to me play Jessica's Theme from The Man From Snowy River if you want.  Disclaimer:  this was before the piano was tuned and finished, so if you are sensitive to pitch and stuff, sorry.  Disclaimer #2 -- I have the talent that should be playing a $100 craigslist piano, not a $25,000 baby grand.  I think you get the point.

I'll be linking up at the great parties at the bottom of the blog.  (If it is your party and you are not okay with the bottom of the blog, please let me know and I will put yours below).

PhotobucketBunny Jeans Decor and More - The Bunny Hop

Friday, September 9, 2011

Feature Friday: Add a Chandelier (M's Room)

Guess what we're starting next week... potty training!  -wish me luck-  So, in honor of that, I'm going to feature the lucky girl's bedroom.

I know.  I know.  I just featured Morgan's room.  But that was the last house.  And there was no new CHANDELIER, which makes a room so much more amazing!  When you find out the price for this chandy, your girls will have them in their bedrooms too... or your living room... or your bedroom.

I was blog stalking one night and I came across a blog that featured this chandy.  I'm sorry I can't give credit to the blog writer.  I don't even remember the blog.  Anyway, I showed Hubs and he said that one day he would take me to Europe and we would find an amazing chandelier just like it.  I promptly replied, "well, we could just get this one from The Home Depot dot com and save all that money to get to Europe."  I told him the price and he told me to get it.  I didn't hesitate.

$49.99 for this!  The Maria Theresa Chandelier from thehomedepot.com.

Are you dying?  Don't you want it, like, now?

(I know the shadow ruins the dramatic effect just a bit in the pic in her room, but look again at the pic from The Home Depot above).


She calls this her Christmas ball.  Don't ask me where she got that name!

Okay, sorry.  I just looked and it is out of stock.  But maybe it will be in stock again (fingers crossed for those who want it).

To be honest, I was going to change her decor when we moved.  I was going to go with a cream and white theme and do a gallery wall of a cute photo shoot that we did a few months ago but she has been having a hard time at this house (the "news house") and wants to go home a lot.  I decided that it would be best if she had her old room from "home" in the "news house."  I think it has helped her adjust.

So lets take a look at the before and after of this room's decor.

Baby -- old house (in my defense, I was going with comfort and expectations of midnight feedings with the recliner)

Toddler -- old house


First two weeks of new house.
 

... and now.


Thursday, September 8, 2011

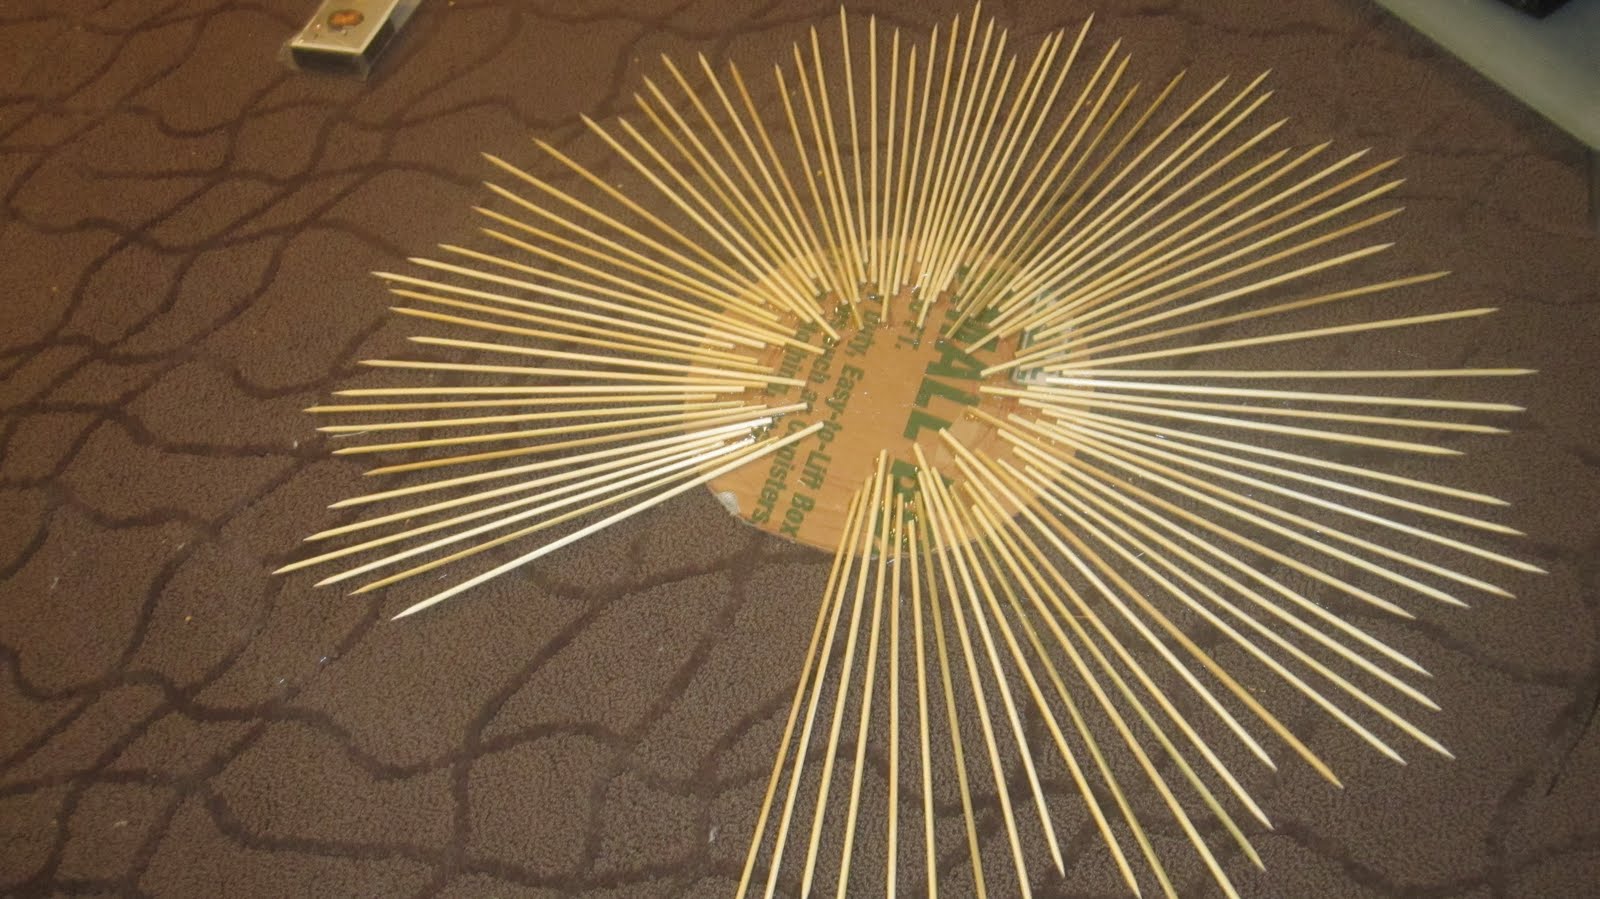
Sunburst Mirror Tutorial No. 2

First off let me tell you... mine is not a mirror.  The store was all out of mirrors and I couldn't wait for them to get more so I made something up.  However, this is meant to be a sunburst mirror.  Mmmkay?

You need: Cardboard, skewers (I used 12 inch), round mirror, hot glue/gun, scissors.  


Step 1: Grab your biggest dinner plate and trace on a cardboard box.  

Step 2: For my pattern I needed more circles so if you do my pattern, grab a smaller plate and trace inside the circle.

Step 3: Trace another smaller circle inside the other circles.

Step 4: Cut out the biggest circle.  You can see the other circles drawn on the cardboard.

Step 5: I wanted one more circle so I used something even smaller to trace.

Step 6: Start gluing your skewers in a pattern.  This is where the circles come in handy.  To keep it uniform, use the circles for your pattern and glue the ends onto the lines.


Step 7:  Glue a thick string on the back so you can hang the mirror.

Step 8: Paint the sunburst your color of choice.

Step 9:  This is where you will be going your separate way if you want an actual mirror.  All you have to do is glue the mirror onto the front of the sunburst.  Make sure you choose a mirror that is big enough to cover the cardboard.  

If, like me, your store is out of mirrors, you'll have to figure something else out.  I had a plate frame that I painted white.  Since the sunburst is going in the same room as my piano, which happens to be the exact color of a Tiffany & Co box (a sign, I'm sure), I grabbed a box and cut a circle to fit into the frame.

Step 10: Since this was not meant to be permanent, I didn't want to glue the frame onto the sunburst.  Instead, I glued a thumb tack on it so I could hang the frame.


Step 11: Hang the frame.


Friday, September 2, 2011

Feature Friday: Living Room

And now the moment you've all I've been waiting for... the LIVING ROOM REVEAL (did you yell that?  I hope so)!  I wanted a neutral room with pops of color that I could change out once in a while.  Also, I want the piano to be the focus/conversation starter, which I think will happen.  Since you know I'm all about saving money, I'll break down a general expense of this room.

view from the stairs

the piano area ($110 including decor)

love seat ($69), lamp ($14), coffee table ($20), end table ($10), couch from Z Gallerie ($2000-ish -- okay, I'm not always super frugal), sunburst mirror that isn't finished ($4)

I know the wall needs more, but I couldn't wait until I was totally done (which I am... never).


 craigslist chair ($61), mantle ($59)

One of my fave parts is this bamboo that I used as a curtain rod.  It was used as decor with some others at our old house and I don't have a place for them here.  I like this use.

I went with indigo for the color of the lamp base from the Anthropologie Inspired Lamp Tutorial that I shared last month.  I love light blue but decided that I would tie it in with the craigslist chair, which has the same color.  The end table that it's on will soon be another before/after thrift store feature.

Here's the sunburst mirror, minus the mirror.  I made it yesterday and will soon post a tutorial for it. 
I'd love to get a giant white rug to put under the couch, love seat, and coffee table but obviously it has to be the right price.

What do you think?  Comments are always welcome!

I'll be linking up to these Linky parties.  Visit them and join in the fun!

The DIY Show Off

Thursday, September 1, 2011

Fireplace Mantle

Things have been moving along pretty slowly here since we moved.  I don't think I mentioned, but this house that we are in now is one that I'm staging.  An acquaintance is losing it and wants to try to short sale beginning this month so I need to get it ready stat!  The problem is that when they moved out, they didn't clean so I have had to clean everything and unpack and decorate and it seems like I just keep going in a circle.  Finally I started tackling the living room.  It's not ready for the full reveal yet, but I am done with the mantle above the fireplace.  

First, I found this amazing candelabra at the thrift store.  I liked it bronze, but I decided to paint it white to match the rest of the mantle decor.   

Tom took the picture of Morgan and I had it printed on a canvas last Christmas.  I got a deal from Groupon and I think it cost around $40 (it's a 16x20).  I got the frame at the thrift store for $2 and painted it.  The flowers next to the picture are my wedding bouquet and Tom's boutonniere (of course I knew how to spell that).  I found the clock at our local grocery store for $13!  Sometimes gems show up in random places.  I got the square mirrors on clearance at The Home Depot as a 4 pack in black for $5.  I painted them white and put two candles in front.  The great thing is that when I get sick of red (and I know I will), it's easy to change things.  

 So there you go.  I hope to have the rest of the living room ready soon.  I can't wait!!!
Related Posts Plugin for WordPress, Blogger...